


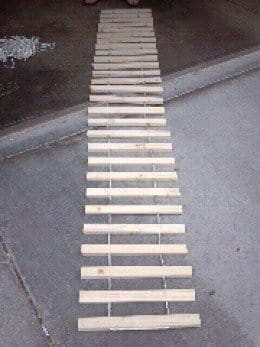
How to Make a Portable Walkway for your RV or Tent
During a stay at a campground, my husband and I saw a wooden walkway (almost resembling a ladder) trailing to the door of an RV. The walkway was a simple idea: walk across the boards to the door and get any loose gravel off of your shoes before entering the RV….no more tracking in chunks of dirt and debris. It’s an issue we deal with quite a bit. The tarp we sit out in front of the trailer doesn’t help too much and although we typically leave our shoes outside, it would probably be more advantageous and safe (Spider in your shoe anyone?) to keep them inside. We decided to make our own “Portable Walk Ways” as we have dubbed them.
The supplies were pretty simple to figure out. We fortunately had the tools to use, so no equipment purchases were made in this project.
The following were supplies we picked up from Lowe’s:
5-1x2x8 pine strips
10 feet of 3/8″ vinyl tubing
18 feet of 3/16″ nylon rope.
Other supplies used were a hand saw, electric drill, 1/4″ drill bit, electric sander, sand paper, two saw horses, wooden plank to serve as table top on saw horses, measuring tape, heavy duty scissors, pencil, permanent marker, twisty (the kind you use to tie garbage bags), and lighter.
Directions:
Step 1: Measure and mark 16-inch long strips of wood. Cut along this line with your hand saw. Continue until you have 28 strips (each measuring 16 inches).
Step 2: Turn the strips so that 1″ side is facing up. From each end, measure 4 inches inward (the measuring tape should be extending toward the center) and mark with a dot, making sure to keep the dot centered in between the edges of the 1″ side. There will be two dots for each strip of wood, one for each end. Use your electric drill with 1/4 ” drill bit to drill the two holes in each strip. You will be stringing the wood strips and vinyl tubing together here.
Step 3: Sand down all sides, ends, and edges of each strip. The sanding process should be quick.The purpose is to lightly smooth down any jagged areas.
Step 4: Measure and mark 2 inch segments on your vinyl tubing. We used a permanent marker. Use heavy duty scissors to cut through the tubing.
Step 5: My husband tried a number of different ways to begin stringing the rope through the strips of wood and vinyl tubing segments. The best method was to burn the end of the rope before threading and cinching a twisty through the rope just below the burnt area. The rope used was approximately 17 feet. Start out by lacing the rope through a hole of a strip of wood; then lace a vinyl tube. (Make sure you keep about 5-6 inches of slack at the ends of the rope so they can be tied at the end.) Continue this pattern of wood, tube, wood, and tube until you come across your 28th or last strip. In a U-turn fashion, after lacing through the final hole of your 28th strip, loop over to the strip’s second hole, lace the rope through the hole, and continue the pattern back up the strips (tubing, wood, tubing, wood).
Step 6: You should end up back at your first wood strip with ample rope hanging out of each hole. First pull and tighten both rope ends to get rid of any excess slack. Tie knots at each rope end, making sure that they are larger than each hole. Use a lighter to burn each knot and secure its position.
Step 7: Admire your handy work!
This project took about two hours to complete and it costs a little over $10 to make. The process was time consuming but we really enjoyed working together. It was relaxing. My husband and I now understand why woodworking was such a big pastime for both of our fathers.
