

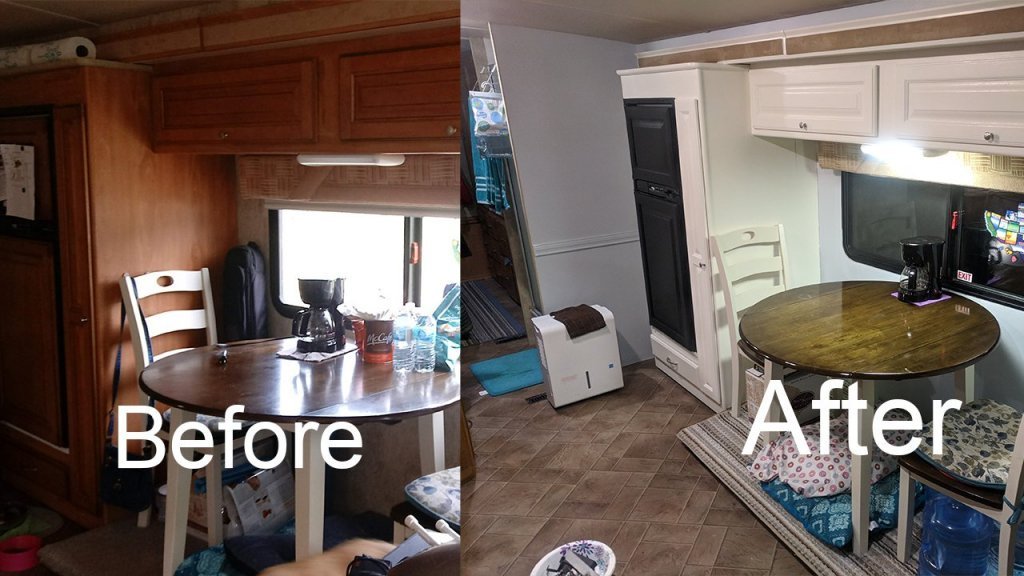
A standard look in RVs is brown…brown cupboards, brown drawers, brown wallpaper, and brown doors. It’s creates a neutral look, but can make the space seem cramped and often outdated. We have been full time RVing in the same 26 foot motorhome for five years and felt like it was time to make a change. We did just that this spring and it was a simple change. We chose a different color scheme.
Perhaps I should clarify the phase “simple change.” The simple change was deciding to paint the interior using lighter colors, soft whites and blues. Another simple change was our method of doing this: 3 steps which I will delve into further. In a nutshell, they included wiping, priming, and painting.
The not so simple part was executing the steps. Painting a space takes time; painting a space like an RV with many tight corners adds to the challenge. However, after all the paint, sweat, and tears, we are very satisfied with the finished product!
We painted over the cabinets, drawers, walls/wallpaper, and even our refrigerator. The first step involved spraying and wiping down all surfaces with a heavy duty remover, Goof Off Heavy Duty Remover. The product helps to remove messes like sticky residue, ink and markers, scuff marks, grease and oil, etc. We sprayed, left for a quick minute and then wiped it off with a clean rag. We taped off areas that we didn’t want painted over before the next step.
The second step was priming. We chose a priming product that sticks to pretty much all surfaces without the need for sanding. We used two coats for the walls and sometimes three for cabinets and drawers. We allowed the primer to sit for an hour in between coats.
Our final step was painting. We used soft white and blue colors to create a much more open look, plus we have a lot of ocean-themed decorations. Glidden provides an array of interior color schemes to choose from at reasonable prices. We purchased ours at Walmart. Again, we applied a couple of coats to all surfaces, but this time there was a 3-4 hour wait between coats. About five days later we started hanging up pictures and decorations.
Our refrigerator stands apart from the rest of the room. We purchased black chalkboard paint for it. Now we can write messages, reminders and grocery lists in a central location.
Levi created a little snippet of our painting experience, including instructions. We have yet to complete the bedroom but it is a work-in-progress. For now, our living area is livable!
What do you think about our changes? Have you made any updates to your RV? Share in the comments below!
If you found this helpful and would like more RVing tips and tricks, click here.
Help keep us on the trail; you can use our affiliate link to do your regular Amazon shopping here or shop at our RV Store featuring a variety of RV-themed items!
Till next time, safe travels and happy trails!

looks lite and airy how you guys doing read article in essapees really nice good job take care sam
Hey Sam! Hope you guys are doing well! We are doing good….working in Minnesota for the summer and then Tennessee for the winter. Thank you for reading the magazine article and giving your feedback!
Love the updated look! You did a great job.
Thanks Edith:) …and thanks for subscribing:) Hope you enjoy our posts!